As with most things in life, your shotgun will last longer and stay in a better working condition if you look after it. Although I would highly recommend taking it to an experienced and qualified Gunmaker or Gunsmith at least every 2 years for a full strip and clean service, there are some simple and inexpensive ways of carrying out preventative maintenance at home. Cleaning your gun thoroughly after every use will ensure that dirt and grease do not build up, stop rust from forming and help to prevent everyday dirt and residue from leading to a serious problem that could cause the gun to fail.
This step-by-step guide will hopefully provide you with some simple but useful tips on how to clean your gun, and possibly give you that extra bit of confidence if you are unsure on what products to use. I must advise, please do not try to take apart the action or internals of your gun and if you have any concerns about damage or wear, seek professional advice as soon as possible.
Before you get started with your cleaning routine, I would recommend making yourself a clean and clear workspace with no debris lying around that could damage the gun. You may also want to remove any jewellery from your hands to avoid it scratching the woodwork, and to make sure your hands are generally clean, dry and free from mud, blood and any other game-day leftovers.
Firstly, take the gun apart by removing the forend, taking off the barrels and laying down each part on your workspace.
You will need…
Clean toothbrush
Cotton buds
Gun oil – Bisley Gun Oil or similar
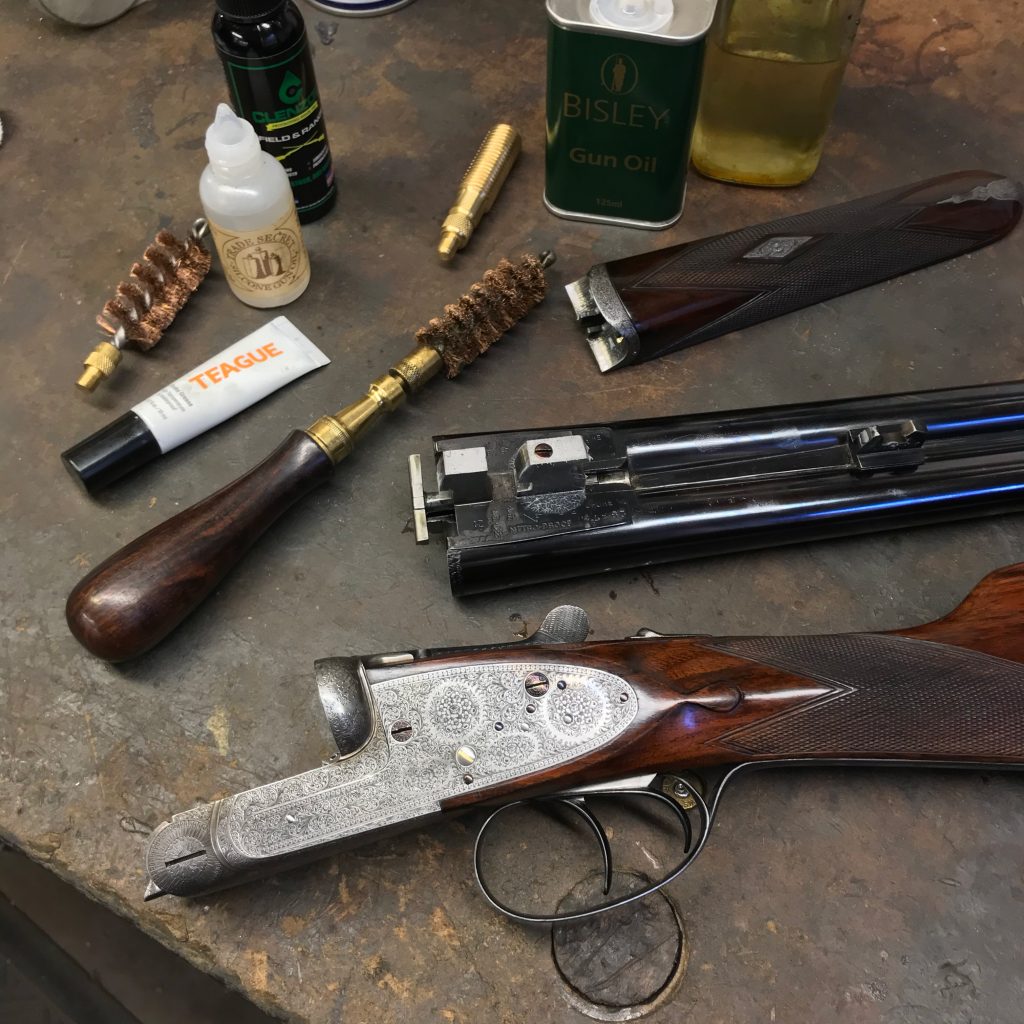
Gun cleaner – Napier Gun Cleaner or similar
Gun grease – Tetra Gun Grease is a personal favourite
Chamber brush
Clean rod
Phosphor bronze brush
Brass jag
Cotton mop
Cleaning roll or kitchen roll
Silicone oil – Trade Secret Silicone Gun Oil is a very good product
Silicone cloth
Barrels
I would recommend starting with the barrels. Focus first on the breech area, pushing the ejectors out and, using a toothbrush, sweeping away any dirt and unburnt powder. A cotton bud can be useful here to clean in those small, hard to reach places, but do try to be gentle.
Spray a small amount of gun cleaner down each tube of the barrels and, starting with the chambers (where the cartridges sit), use a chamber brushto scrub away any powder or plastic residue.
A cleaning rod with the phosphor bronze brush attachment should be used to run up and down the inside of each barrel, making sure to get right up to the chokes and back down to the chambers. You can be quite thorough with this, going up and down several times to dislodge any deposits.
Now I would recommend swapping the rod attachment over to the brass jag and adding a piece of cleaning roll. The roll should fit snuggly down the barrels, small enough that you can push the rod all the way to the end but big enough that it forces the dirt out, rather than just moving it up and down. The cleaning roll, which was originally white, should come out covered in dirt and grime. Repeat this process with a fresh piece of roll until it comes out clean.
To finish off the inside of the barrels, use a cotton mop attachment on your cleaning rod with a small squeeze of gun oil. By running the cotton mop through the barrels, you will ensure the insides are completely clean, and the mop will add a thin, even coat of oil to prevent rust. Finish off the barrels with a final wipe of the ejectors to remove any dirt that has come out whilst cleaning.
Action
I would recommend using a toothbrush to brush over the exposed metalwork of the action. The bristles are perfect for dislodging any build-up of grease but are soft enough that they won’t harm the action even if you apply reasonable force. A clean cotton bud can also be useful here to reach into the small fiddly areas, but be very gentle as they can get stuck or snap off if used too harshly.
Stock
Start by running a clean toothbrush through the chequering to dislodge any hidden dirt. You can then wipe the stock over with a clean cloth to remove any surface dirt before adding a little silicone oil and rubbing it evenly into the woodwork. Don’t use too much oil though — a little goes a long way. Repeat with the forend, trying to avoid getting any oil into the chequering.
Once the gun has been thoroughly cleaned, it’s time to reassemble. Add a small amount of grease to the parts of the metalwork that will rotate on other metal – the knuckle, barrel lumps, and fore-end loop. Then you can put the barrels back onto the action and attach the forend. A final wipe over with your cloth and your gun is well cleaned and ready to be put away until your next game day or outing at the clay ground.
This process is a great way of cleaning a day’s dirt from your gun and will help to keep it in good condition and free of rust, reducing the natural wear and tear, and could save you a lot of money in the long run. Combine this cleaning routine with a professional service once every 1 to 2 years, and a sound shotgun should last you a lifetime.
Top Tips…
Kitchen roll is a very good alternative to cleaning roll. It will do the same job and costs a fraction of the price!
A silicone cloth and silicone oil are fantastic products to keep in your cleaning kit as they can be used on both the stock and barrels.
Never leave your gun in a wet slip, even if it’s just for a few hours. The water and warmth within a slip will create the perfect environment for rust to form in only a very short space of time.
Dry your gun off after every drive (or clay stand) if you are shooting in particularly wet weather. A cleaning cloth and small bottle of silicone oil is a great addition to your in-field shooting kit, and always leave your gun to dry naturally away from direct heat at the end of the day.
Written by Rachel Draper of I.S. Sweetman Guns